Above is a screenshot of midi notes that I have on my timeline that I have set up to control a Waves Tune plugin scale root, on/off & scale type within Logic on a completely separate Mac on the same network.
What I want to work out, is a way that rather than only being able to control it from the timeline, to fire a midi note within Ableset by pressing a pad OR potentially using a rotary knob to select a specific midi note and then have another pad to fire it (second option would total less buttons used on the midi controller)
With the power of canvas view - I then wonder if it’s possible to get some sort of visual feedback on all the above?
This is getting more complex pretty quick - but the way I imagine it is that the box with each of the notes you can see and their respective labels on the canvas view is outlined to show you have it ‘cued’ to fire and then when you fire the note the box fills in with colour to basically show that’s what’s currently active. Double bonus if it also reacts to what is on the timeline as well.
Anyway, I really appreciate all you do here and the fast responses to very specific individual questions, it’s above and beyond! Looking forward to hearing back on whatever creative solution there may be (if any)
You can definitely trigger those MIDI notes from a Canvas button and have the Canvas reflect what’s happening on the timeline.
Your setup would look like this:
1. Canvas Button (fires the note + updates the visual state)
In your Canvas, add a Button and set Script On Press to:
if (shared("waves_note_60")) {
  // was already active → turn it off
  setShared("waves_note_60", false);
} else {
  // activate it
  setShared("waves_note_60", true);

  // send the MIDI note to your Waves/Logic Mac
  const output   = "YOUR MIDI DEVICE"; // exact name of the MIDI port that goes to Logic/Waves
  const channel  = 1;
  const note     = 60;      // or "C4"
  const velocity = 100;
  const duration = 120;     // ms

  sendOsc("/midi/send/note", output, channel, note, velocity, duration);
}
2. Visual feedback in the Canvas
For the element that represents this note, set Background Color to:
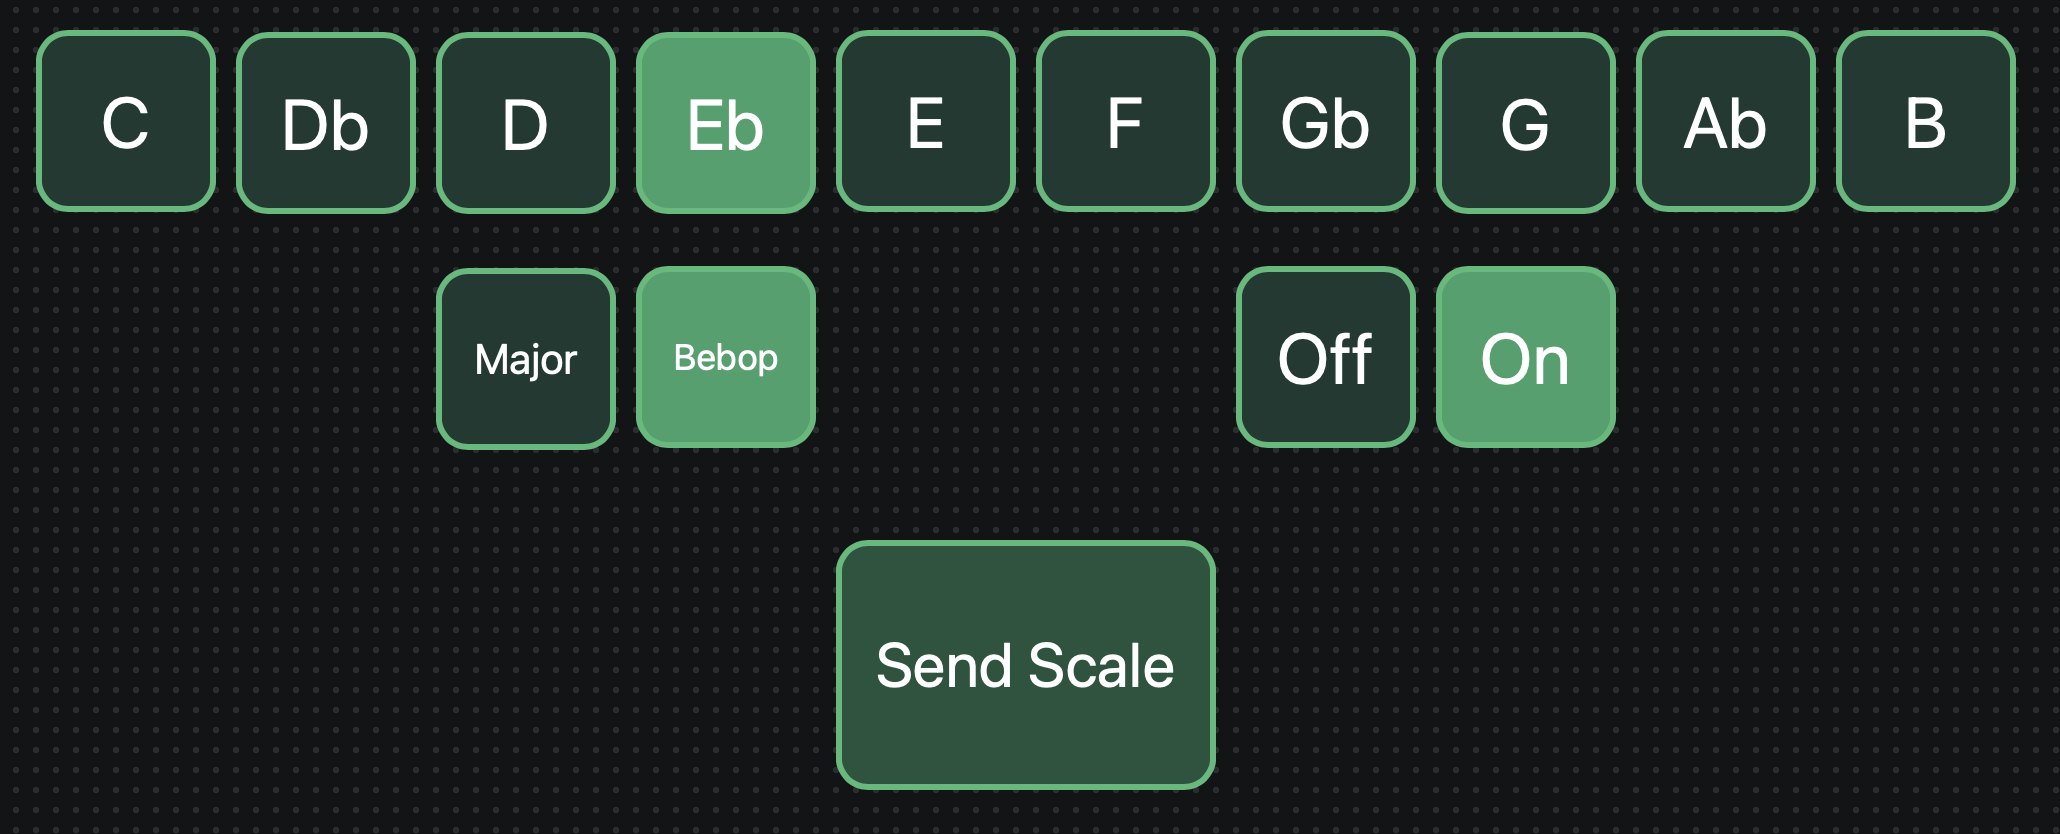
This canvas lets you select the root note, scale, and state, and activate it by tapping “Send Scale”. I wasn’t sure which notes you were sending to the other computer, so I took a guess:
Root note: C0 – B0
Major: C1
Bebop: C#1
Off: D1
On: D#1
You can change those values in the buttons’ properties.
Since these buttons use shared variables, you can also change them from a connected MIDI controller using AbleSet’s MIDI mapping features.
To get feedback from the clips in your Live project, you could route the MIDI that goes to the other Mac into a loopback so it can be mapped to AbleSet again.
Alternatively, you could split your MIDI track into three tracks – one per “category” of commands. Then rename the clips to the note they send and name your track like this: AUTO TUNE NOTE +OSC [/shared/autotuneNote], AUTO TUNE SCALE +OSC [/shared/autotuneScale], AUTO TUNE ACTIVE +OSC [/shared/autotuneActive].
Let me know if this suits your use case and if you have any further questions